Wednesday, February 26, 2014

Couture Creations Design Team Application Round 2

I am very honored and excited to have made it to Round Two! 
For this round we are required to create a new project using Couture Creations embossing folders, and either decorative, doily, or nesting dies. 


I've included full instructions on how I created this layout. 

1. Trim cut-off strip from all papers.  Trim 1 1/4 inches from top and one side of Vintage Christmas (blue snowflakes).

 
2. Punch (blue snowflake) paper randomly using Martha Stewart edge punches.  Distress un-punched areas, and ink all edges.   Ink edges of background paper.


3. Emboss the corners using 'Serene', and 'Peace And Joy' embossing folders as shown.  Ink the raised pattern.


4. Distress using a Crop-A-Dile, punching small and large holes.  Attach a few eyelets to create contrast.

 
5. Attach to background paper using Couture Creations double-sided tape.

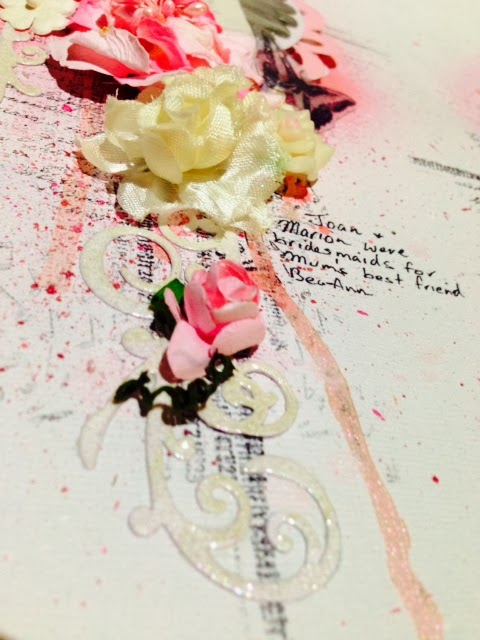
6. Die-cut a doily using Alycyone Doily Die.  I found the Quick Release Paper to be awesome, making it really easy to cut and release the paper from the die.  I have a great tip for you, because you were probably wondering why I have a washing up brush in the photo!  Gently brush over your paper and the dies and it will push out all those tiny pieces of paper.  No more endless poking with an awl (aka 'pokey tool').

7. Tear pieces of the doily and slip it between papers as shown.


8. Emboss Core'dinations Whitewash cardstock in 'Watering Can'' using 'Project Journal Cards' embossing folder.  Sand embossed pattern to reveal the core colour.  Cut out as shown, and distress edges.
 
9. Cut and emboss three 'Party Banner' from Core'dinations Pine Needles Distress.  Cut two 'Moments In Time' from Watering Can Whitewash, and two 'Dolce' from Pine Needles Distress and Vintage Christmas paper.

10. Cut strip of paper 5 3/4 x 2 3/4 inch, and Whitewash 9 x 3 3/4. Notch into ends to create a banner shape.  Emboss the Whitewash with 'Pinstripe' embossing folder and sand.  Layer elements as shown.


11. Mat photo with Vintage Christmas paper.  Die cut some snowflakes from a variety of paper and cardstock.


I also spritzed with some mists, and added Couture Creations Gemstones and Pearls, as well as some Glitzin Glamour  'Crystalina'.


I hope you've enjoyed this tutorial, and that I've inspired you to go create something.   (I'd love to see your version, so drop me a link in the comments section if you post it on your blog)

Happy scrapping,
Tina

Sunday, February 16, 2014

Couture Creations 2014 Design Team Audition

I created an easel card by stamping onto acetate before layering it over the lovely Couture Creations paper.  This is from their Vintage Christmas range, but it's so pretty that it works perfectly here.


I created this layout using lots of Couture Creations dies, and stamps


I love the new stamps, especially the script.  They are so versatile and very usable.

 I used Couture Creations High Tack foam tape between my diecut layers to add dimension.

The following example utilizes dies and stamping techniques to create a layout using only cardstock and some paper scraps.  The Couture Creations butterflies were stamped onto acetate and fussy cut.  The acetate was folded before I attached it to the page, which creates a dimensional 3D effect.


A canvas I created using dies and lots of mixed media techniques and mediums, lots of fun to make!  I even used a cut from a Couture Creations die as a stencil to apply mediums over, it worked really well and gave me yet another use for my dies.


Thursday, February 13, 2014

DT projects for Twiddleybitz

Hello!
Just a quick post to share some of my Design Team projects for Twiddleybitz.


Twiddleybitz Products:
BAN001 - Banner
BUT003 - Butterflies Assorted
BUT007 - Butterfly multipack

 
I've layered laces, doilies, patterned papers, and muslin to create a base for my layout, before adding some Gesso, and Lindy's Stamp gang Starburst sprays.
I created flowers from small material pieces I had left over from sewing the dance costumes.


 The Tim Holtz Crackle Paint was applied thicker in some areas to give a variety of crack sizes.


I created a pocket behind the photo, using foam tape, for my journaling tag to easily slide in.
 
Twiddleybitz Products used:
GAT005 - Gate with lamp posts
FRA007 - Detailed Window Frame
W1003 - Wrought Iron border

Have a great day, I hope I've inspired you to get creative today!
Happy scrapping,
Tina

Monday, February 10, 2014

First pointe shoes.

Hi everyone, just a quick share this evening with a layout I did at a recent Scrapbooking retreat.  It celebrates my youngest daughter getting her first pointe shoes for ballet. 


And look.... I actually journalled!  (I'm trying hard to do more of this)


I'm entering this in the Southern Girls "bling" Challenge
 
Twiddleybitz products used:
GRUN001T - Grunge alphabet

Cracking Up???

February brings a Crackle Challenge on the Twiddleybitz site and I've had fun playing with lots of crackle effects.

I created this layout using Tim Holtz crackle paint on the leftover packaging frames, and used a Kaisercraft crackle stamp on my background.  


My leftover letters and numbers were put to use as embellishments, I first painted them with  Lindy's Stamp Gang Starbursts, and once dry, covered them with Crackle Accents.
Twiddleybitz Products:
Tweeny Bitz cogs - TWBT011
Mosaic grab bag - BAS023
Ittybitty Alphabet - ALPHA005
(Frames from cogs, Fairy Blossums FAIR005, & Tweenybitz Snowflakes TWBT006)

I decided to join in on Tim's 12 Tags of 2014 and here's what I created...


And another tag which I created for a Vintage tag swap in a Facebook group


 I'll be back tomorrow with some more crackled inspiration!

LinkWithin

Related Posts with Thumbnails